Hiển thị các bài đăng có nhãn Popular Posts. Hiển thị tất cả bài đăng

Ghép 2 tiện ích Popular Posts với nhau

Người đăng: buonkhongem on Thứ Ba, 16 tháng 8, 2011

Tiện ích Bài đăng phổ biến (Popular Posts) rất quan trọng đối với blogspot, nó giúp gây sự chú ý của độc giả, giúp dễ tìm đọc những bài viết nổi bật nhất trong tuần, trong tháng hoặc toàn thời gian đồng thời tăng cường traffic cho blog của bạn.

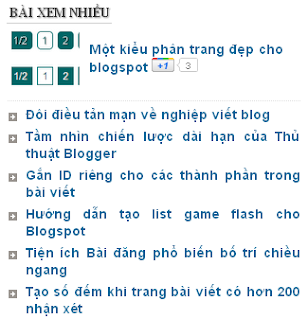
Ngoài cách bố trí các bài viết phổ biến theo chiều nằm ngang, mình sẽ giúp các bạn một cách bố trí khác và có phần lạ lẫm, đó là ghép 2 tiện ích Popular Posts lại với nhau; theo đó sẽ tạo định dạng bài đầu tiên có ảnh đại diện và tiêu đề bài viết, các bài còn lại hiển thị danh sách tiêu đề bài viết, kết hợp thuộc tính title là đoạn trích dẫn bài viết (snippet). Định dạng này không thể thực hiện được trên một tiện ích Popular Posts riêng biệt, vì thế ý nghĩ ghép 2 tiện ích đã giúp mình thực hiện thành công thủ thuật này. Bạn có thể xem Demo trên trang chủ của Thủ thuật Blogger.

Nào, chúng ta cùng thực hiện như sau:

Bước 1. Đăng nhập Blogger, vào Design >> Edit HTML, chọn Expand Widget Templates. Tìm đến thẻ đóng </b:widget> của một tiện ích nào đó mà bạn muốn bố trí tiện ích này gần với nó, sau đó đặt sau thẻ đóng </b:widget> này bằng đoạn code bên dưới:
<b:widget id='PopularPosts101' locked='false' title='Bài xem nhiều' type='PopularPosts'>
<b:includable id='main'>
<b:if cond='data:title'><h2><data:title/></h2></b:if>
<div class='widget-content popular-posts'>
<ul>
<b:loop values='data:posts' var='post'>
<li><div class='PPcontent'>
<b:if cond='data:showThumbnails == &quot;false&quot;'>
<b:if cond='data:showSnippets == &quot;false&quot;'>
<!-- (1) No snippet/thumbnail -->
<a expr:href='data:post.href'><data:post.title/></a>
<b:else/>
<!-- (2) Show only snippets -->
<div class='item-title'><a expr:href='data:post.href' expr:title='data:post.snippet'><data:post.title/></a>
</div>
</b:if>
<b:else/>
<b:if cond='data:showSnippets == &quot;false&quot;'>
<!-- (3) Show only thumbnails -->
<div class='item-thumbnail-only'>
<b:if cond='data:post.thumbnail'>
<div class='item-thumbnail'>
<a expr:href='data:post.href' target='_blank'>
<img alt='' border='0' expr:height='data:thumbnailSize' expr:src='data:post.thumbnail' expr:width='data:thumbnailSize'/>
</a>
</div>
</b:if>
<div class='item-title'><a expr:href='data:post.href'><data:post.title/></a></div>
</div>
<div style='clear: both;'/>
<b:else/>
<!-- (4) Show snippets and thumbnails -->
<div class='item-content'>
<div class='item-thumbnail'>
<b:if cond='data:post.thumbnail'>
<a expr:href='data:post.href' target='_blank'>
<img alt='' border='0' expr:height='data:thumbnailSize' expr:src='data:post.thumbnail' expr:width='data:thumbnailSize'/>
</a>
<b:else/>
<img class='item-nothumb' expr:height='data:thumbnailSize' expr:width='data:thumbnailSize' src='https://blogger.googleusercontent.com/img/b/R29vZ2xl/AVvXsEip72A7nOCRmchyphenhyphenhMUlEHi-LOGvrsxfp6zqpnhIh66IFHSTiSWwS7tzp4Xk5hu2QuatNgA88cKq5HixEvZ08hsQWsMGl0mdtLsaHhzuxX43hI8jsQKpCxKLD-WUpIPn-o_EiROBJ3W2xrM/s1600/no-image.png'/>
</b:if>
</div>
<div class='item-title'><a expr:href='data:post.href' expr:title='data:post.snippet'><data:post.title/></a> <g:plusone expr:href='data:post.href' size='small'/></div>
</div>
<div style='clear: both;'/>
</b:if>
</b:if>
</div></li>
</b:loop>
</ul>
</div>
</b:includable>
</b:widget>
<b:widget id='PopularPosts102' locked='false' title='Bài đăng phổ biến' type='PopularPosts'>
<b:includable id='main'>
<!--
<b:if cond='data:title'><h2><data:title/></h2></b:if>
-->
<div class='widget-content popular-posts'>
<ul>
<b:loop values='data:posts' var='post'>
<li><div class='PPcontent'>
<b:if cond='data:showThumbnails == &quot;false&quot;'>
<b:if cond='data:showSnippets == &quot;false&quot;'>
<!-- (1) No snippet/thumbnail -->
<a expr:href='data:post.href'><data:post.title/></a>
<b:else/>
<!-- (2) Show only snippets -->
<div class='item-title'><a expr:href='data:post.href' expr:title='data:post.snippet'><data:post.title/></a>
</div>
</b:if>
<b:else/>
<b:if cond='data:showSnippets == &quot;false&quot;'>
<!-- (3) Show only thumbnails -->
<div class='item-thumbnail-only'>
<b:if cond='data:post.thumbnail'>
<div class='item-thumbnail'>
<a expr:href='data:post.href' target='_blank'>
<img alt='' border='0' expr:height='data:thumbnailSize' expr:src='data:post.thumbnail' expr:width='data:thumbnailSize'/>
</a>
</div>
</b:if>
<div class='item-title'><a expr:href='data:post.href'><data:post.title/></a></div>
</div>
<div style='clear: both;'/>
<b:else/>
<!-- (4) Show snippets and thumbnails -->
<div class='item-content'>
<div class='item-title'><a expr:href='data:post.href' expr:title='data:post.snippet'><data:post.title/></a></div>
</div>
<div style='clear: both;'/>
</b:if>
</b:if>
</div></li>
</b:loop>
</ul>
</div>
</b:includable>
</b:widget>
Chú ý dòng <g:plusone expr:href='data:post.href' size='small'/> là mình khuyến mãi thêm cái nút G+ trên tiêu đề bài viết đầu tiên, muốn nó hiện thì thêm đoạn code sau đây trước thẻ </body>.

<script src='http://apis.google.com/js/plusone.js' type='text/javascript'></script>

Nếu không thích hàng khuyến mãi này thì bạn có thể xóa nó đi nhé. :51)

Bước 2. Đặt code CSS dưới đây vào trước dòng ]]></b:skin>.
#PopularPosts101 .popular-posts ul{list-style-type:none;margin:0;padding:0}
#PopularPosts101 .widget-content ul li{margin;border-bottom:1px dotted #DDD}
#PopularPosts101 .item-thumbnail{padding-left:5px}
#PopularPosts101 .item-title{padding:18px}
#PopularPosts102 ul li a{color:#069;text-decoration:none;background:url(https://blogger.googleusercontent.com/img/b/R29vZ2xl/AVvXsEjq6PyPRoDehCcvFT_A8Gf9twIr4uena0oUmtMhxT1VOFNdl3v6YXEqa7rox5PHDZs3EwjP-ob3wysrOuqbdGe8sAJuthH21sBPlV8NRE_0skJfg9IRdQHSVBGrD56FK_LIz6xLDN0DSmA/s1600/arrow.gif) no-repeat left 5px;padding-left:20px;display:block;margin:0;float:left}
Lưu Template.

Bước 3. Vào Page Elements, chỉnh sửa tiện ích có tiêu đề Bài xem nhiều, hiển thị dạng All time, chọn image thumbnail, snippet và chỉ hiển thị 1 bài viết. Tiếp tục chỉnh sửa tiện ích có tiêu đề Bài đăng phổ biến, hiển thị dạng Last 7 days, chọn snippet (không chọn thumbnail) và cho hiển thị 5-7 bài viết. Làm như thế này để tránh trường hợp bài viết phổ biến thứ nhất có ảnh đại diện lặp lại ở danh mục các bài viết phổ biến không có ảnh đại diện do sử dụng đến 2 tiện ích Popular Posts.
More about

Tiện ích Bài đăng phổ biến bố trí chiều ngang

Người đăng: buonkhongem on Chủ Nhật, 14 tháng 8, 2011

Các bạn có thể thấy tại trang chủ của Thủ thuật Blogger có một list 5 bài viết nóng nhất trong tháng được bố trí theo chiều ngang. Tiện ích này được hình thành từ ý tưởng thiết kế một tiện ích riêng tặng cho bạn Nguyễn Đức, là một tác giả vừa gia nhập Thủ thuật Blogger. Ban đầu mình còn nghĩ sẽ tạo thêm hiệu ứng trượt ngang cho tiện ích này, nhưng rồi mình không phát triển ý tưởng này vì vốn dĩ mình không thích các hiệu ứng rất tốn tài nguyên, hơn nữa tiện ích này sử dụng bản gốc tiện ích Popular Posts chỉ hiển thị tối đa 10 bài đăng nên hiệu ứng trượt có thể không cần thiết. Nhờ ý nghĩ về quà tặng cho các tác giả đã gia nhập Thủ thuật Blogger mà mình có thêm cảm hứng mới, rốt cuộc đã cho ra đời thêm một tiện ích như vậy, các bạn có thể chiêm ngưỡng và bắt đầu cài đặt cho blogspot của mình nếu thấy cần thiết.


Tiện ích này cần được đặt dưới phần Header và trên phần content-wrapper vì thế chúng ta cần tạo thêm một phần crosscol-wrapper nằm giữa 2 thành phần nói trên. Về việc tạo riêng crosscol-wrapper cho blogspot, bạn có thể đọc thêm ở bài viết này. Ở đây mình đã tích hợp gắn tiện ích Popular Posts vào phần crosscol-wrapper này rồi.

Bước 1. Đăng nhập Blogger, vào Design >> Edit HTML. Chọn Expand Widget Templates.

Tìm dòng <div id='content-wrapper'> và đặt trước nó với đoạn code bên dưới.
<div id='crosscol-wrapper'>
<b:section class='crosscol' id='crosscol' preferred='yes'>
<b:widget id='PopularPosts200' locked='false' title='' type='PopularPosts'>
<b:includable id='main'>
<b:if cond='data:title'><h2><data:title/></h2></b:if>
<!-- Horizontally Styled Popular Posts widget by www.thuthuatblogger.info -->
<div class='widget-content popular-posts'>
<ul>
<b:loop values='data:posts' var='post'>
<li>
<b:if cond='data:showThumbnails == &quot;false&quot;'>
<b:if cond='data:showSnippets == &quot;false&quot;'>
<!-- (1) No snippet/thumbnail -->
<a expr:href='data:post.href'><data:post.title/></a>
<b:else/>
<!-- (2) Show only snippets -->
<div class='item-title'><a expr:href='data:post.href' expr:title='data:post.snippet'><data:post.title/></a>
</div>
</b:if>
<b:else/>
<b:if cond='data:showSnippets == &quot;false&quot;'>
<!-- (3) Show only thumbnails -->
<div class='item-thumbnail-only'>
<b:if cond='data:post.thumbnail'>
<div class='item-thumbnail'>
<a expr:href='data:post.href' target='_blank'>
<img alt='' border='0' expr:height='data:thumbnailSize' expr:src='data:post.thumbnail' expr:width='data:thumbnailSize'/>
</a>
</div>
</b:if>
<div class='item-title'><a expr:href='data:post.href'><data:post.title/></a></div>
</div>
<div style='clear: both;'/>
<b:else/>
<!-- (4) Show snippets and thumbnails -->
<div class='item-content'>
<div class='item-thumbnail'>
<b:if cond='data:post.thumbnail'>
<a expr:href='data:post.href' target='_blank'>
<img alt='' border='0' expr:src='data:post.thumbnail'/>
</a>
<b:else/>
<a expr:href='data:post.href' target='_blank'>
<img src='https://blogger.googleusercontent.com/img/b/R29vZ2xl/AVvXsEiccUbf670WtzcbROEk03KXSGig85V16LckuHY2tyUKVPcmzrykHu-_mbIwHY9_jqlXfpLmOOvT1JZQWOg8udRGVALVoZEg3yVvnz4xiMLtmMwTlVuVg7ZmDq8F2gSNuT1lITBWLa0asGs/'/>
</a>
</b:if>
</div>
<div class='item-title'><a expr:href='data:post.href' expr:title='data:post.snippet'><data:post.title/></a></div>
</div>
<div style='clear: both;'/>
</b:if>
</b:if>
</li>
</b:loop>
</ul>
</div>
</b:includable>
</b:widget>
</b:section>
</div>
<div style='clear: both;'/>
Bước 2. Đặt đoạn code CSS bên dưới vào trước dòng ]]></b:skin>.
#crosscol-wrapper{margin: 0 auto; padding:0}
#PopularPosts200{width: 100%; margin: 0px auto; padding: 5px 0px}
#PopularPosts200 h2{display:none}
#PopularPosts200 .widget-content{float:left;margin:0; padding:0}
#PopularPosts200 .widget-content ul {margin: 0 auto;padding:0;width: 100%; list-style:none}
#PopularPosts200 .widget-content ul li {margin:0 6px 10px 6px;width: 175px;padding:10px;height: 100px; overflow:hidden;list-style:none; float:left; border: 1px solid #DDD;}
#PopularPosts200 .item-content{font-size: 14px; text-align:left; padding: 5px 10px}
#PopularPosts200 img{margin:0;padding:0; background: #fff; float:left;width:65px;height:65px;border: 1px solid #DDD}
#PopularPosts200 .item-title{line-height:1.3em}
Lưu Template là xong. Sau đó có thể vào Page Elements chỉnh sửa tiện ích để chọn bài phổ biến theo tuần, theo tháng hoặc toàn thời gian. Riêng về CSS nói trên, mình để ngỏ để các bạn tùy ý tùy biến sao cho phù hợp với giao diện blogspot của bạn. Nếu gặp vấn đề gì (đối với newbie) xin vui lòng lưu lại thông tin ở phần Comments để mình sắp xếp giải đáp.
More about

Tiện ích Bài viết Hot cho blogspot

Người đăng: buonkhongem on Thứ Ba, 1 tháng 3, 2011

Tiện ích Bài viết Hot (Hot Posts Widget) là tiện ích hiển thị những bài viết được bạn đọc quan tâm và có nhiều nhận xét nhất. Tiện ích này khác với tiện ích Popular Posts hiển thị những bài viết được xem nhiều nhất.

Script trong thủ thuật sau đây sẽ lọc những bài viết được bình luận nhiều nhất trong blogspot để tạo ra tiện ích mà tôi đặt tên là Hot Posts. Tiện ích này hiển thị tiêu đề bài viết và số nhận xét cho mỗi bài viết. Thiết nghĩ đây cũng là một tiện ích cần thiết cho blogspot, bên cạnh tiện ích Popalar Posts sẵn có của Blogger.

Bạn có thể xem Demo dưới đây.

Bài viết Hot


Để cài đặt tiện ích này, bạn hãy thực hiện như sau.

Bước 1. Đăng nhập Blogger, vào Design >> Edit HTML. Đặt đoạn code bên dưới vào trước thẻ </head>.

<script type='text/javascript'>
//<![CDATA[
// Hot Posts Widget styled by Huynh-nhat-ha.blogspot.com
getHP=function(d){document.write(d)};
hotPost = function(u,t,c,b) { this.url = u; this.tit = t; this.comm = c; this.body = b };
var sortAllPosts=[];
sortAllPostsRecopilation = function (json) {
var total,entry,i,x,arr,lnk,com,ttle;
total = json.feed.entry.length;
for(i=0; i < total; i++){
entry=json.feed.entry[i];
for (x=0; x < entry.link.length; x++){
arr = entry.link[x];
lnk = (arr.rel=="alternate" ? arr.href : lnk);
if(arr.rel=="replies"){
com = (arr.type=="text/html" ? parseInt(arr.title,10) : com);
}
}
ttle = entry.title.$t;
txt = ('summary' in entry ? entry.summary.$t : entry.content.$t);
sortAllPosts.push(new hotPost(lnk,ttle,com,txt));
}
sortAllPosts=sortAllPosts.OrderMaxMin();
};
Array.prototype.OrderMaxMin = function(){
var max=0;
var tmp=[];
var x,i,post;
for(i=0; i<this.length; i++){
post=this[i];
max = ( post.comm > max ? post.comm : max);
}
for(x = max; x>=0; x--){
for(i=0; i<this.length; i++){
post=this[i];
if(post.comm == x){
tmp.push(post);
}
}
}
return(tmp);
};
Array.prototype.DisplayHotPosts = function(max,txt) { for(var i=0; i<max;i++){ p=this[i]; getHP(p.tit.link(p.url)+" ("+p.comm+" nhận xét)<br/>"); }};
//]]>
</script>

Lưu Template.

Bước 2. Vào Page Elements. Trên sidebar thêm một tiện ích HTML/Javascript và đặt đoạn code sau đây vào phần nội dung tiện ích (đặt tên tiện ích là Bài viết Hot hay tên gì đó tùy ý bạn).

<div id='HotPosts'>
<script src='http://huynh-nhat-ha.blogspot.com/feeds/posts/default?alt=json-in-script&callback=sortAllPostsRecopilation&max-results=999' type='text/javascript'></script>
<script type='text/javascript'>sortAllPosts.DisplayHotPosts(7,00);</script>
</div>

Thay huynh-nhat-ha bằng tên blogspot của bạn, thay số 7 để chỉ số bài viết được hiển thị trên tiện ích.

Lưu ý nếu bạn rành về CSS thì có thể định dạng CSS cho tiện ích này theo kiểu như sau.

#HotPosts {
….
}
#HotPosts a {

}
More about

Tùy biến tiện ích Bài xem nhiều nhất

Người đăng: buonkhongem on Thứ Tư, 12 tháng 1, 2011

Gần đây Blogger đã tích hợp tiện ích Bài đăng phổ biến (Popular Posts) tuy nhiên có một số điểm mà nó vẫn chưa được ưa thích và sử dụng rộng rãi. Một nguyên do có thể thấy rõ là người dùng chưa biết cách điều chỉnh thuộc tính CSS định dạng cho tiện ích trở nên đẹp hơn, lấy ví dụ ở phần tóm tắt bài viết, đoạn text không thể căn đều hai bên mặc dù chúng ta dùng thuộc tính text-align:justify cho phần sidebar là nơi thường bố trí tiện ích này. :21)

Mình đã nghĩ đến việc tạo CSS cho tiện ích này và đã áp dụng thành công và làm cho tiện ích này trở nên đẹp hơn.

Bạn có thể xem Demo ở bên phần sidebar của trang này.

Để làm được như vậy bạn hãy thực hiện theo các bước sau đây.

Bước 1. Đăng nhập Blogger, vào Design >> Page Elements >> Add a Gadget (trên sidebar) >> Chọn Popular Posts >> Điều chỉnh Title thành Bài xem nhiều nhất, tick chọn image thumbnail và snippet. Sau đó nhấn SAVE để lưu tiện ích.


Bước 2. Vào Edit HTML, chọn Expand Widget Templates. Tìm từ khóa PopularPosts1 hoặc Bài xem nhiều nhất rồi tìm toàn bộ đoạn code tương tự đoạn code bên dưới

<b:includable id='main'>
<b:if cond='data:title'><h2><data:title/></h2></b:if>
<div class='widget-content popular-posts'>
<ul>
<b:loop values='data:posts' var='post'>
<li>
<b:if cond='data:showThumbnails == &quot;false&quot;'>
<b:if cond='data:showSnippets == &quot;false&quot;'>
<!-- (1) No snippet/thumbnail -->
<a expr:href='data:post.href'><data:post.title/></a>
<b:else/>
<!-- (2) Show only snippets -->
<div class='item-title'><a expr:href='data:post.href'><data:post.title/></a></div>
<div class='item-snippet'><data:post.snippet/></div>
</b:if>
<b:else/>
<b:if cond='data:showSnippets == &quot;false&quot;'>
<!-- (3) Show only thumbnails -->
<div class='item-thumbnail-only'>
<b:if cond='data:post.thumbnail'>
<div class='item-thumbnail'>
<a expr:href='data:post.href' target='_blank'>
<img alt='' border='0' expr:height='data:thumbnailSize' expr:src='data:post.thumbnail' expr:width='data:thumbnailSize'/>
</a>
</div>
</b:if>
<div class='item-title'><a expr:href='data:post.href'><data:post.title/></a></div>
</div>
<div style='clear: both;'/>
<b:else/>
<!-- (4) Show snippets and thumbnails -->
<div class='item-content'>
<b:if cond='data:post.thumbnail'>
<div class='item-thumbnail'>
<a expr:href='data:post.href' target='_blank'>
<img alt='' border='0' expr:height='data:thumbnailSize' expr:src='data:post.thumbnail' expr:width='data:thumbnailSize'/>
</a>
</div>
</b:if>
<div class='item-title'><a expr:href='data:post.href'><data:post.title/></a></div>
<div class='item-snippet'><data:post.snippet/></div>
</div>
<div style='clear: both;'/>
</b:if>
</b:if>
</li>
</b:loop>
</ul>
<b:include name='quickedit'/>
</div>
</b:includable>

Rồi thay nó bằng đoạn code bên dưới.

<b:includable id='main'>
<b:if cond='data:title'><h2><data:title/></h2></b:if>
<div class='widget-content popular-posts'>
<ul>
<b:loop values='data:posts' var='post'>
<li>
<b:if cond='data:showThumbnails == &quot;false&quot;'>
<b:if cond='data:showSnippets == &quot;false&quot;'>
<!-- (1) No snippet/thumbnail -->
<a expr:href='data:post.href'><data:post.title/></a>
<b:else/>
<!-- (2) Show only snippets -->
<div class='item-title'><a expr:href='data:post.href'><data:post.title/></a></div>
<div class='item-snippet'><data:post.snippet/></div>
</b:if>
<b:else/>
<b:if cond='data:showSnippets == &quot;false&quot;'>
<!-- (3) Show only thumbnails -->
<div class='item-thumbnail-only'>
<b:if cond='data:post.thumbnail'>
<div class='item-thumbnail'>
<a expr:href='data:post.href' target='_blank'>
<img alt='' border='0' expr:height='data:thumbnailSize' expr:src='data:post.thumbnail' expr:width='data:thumbnailSize'/>
</a>
</div>
</b:if>
<div class='item-title'><a expr:href='data:post.href'><data:post.title/></a></div>
</div>
<div style='clear: both;'/>
<b:else/>
<!-- (4) Show snippets and thumbnails -->
<div class='item-content'>
<div class='item-thumbnail'>
<b:if cond='data:post.thumbnail'>
<a expr:href='data:post.href' target='_blank'>
<img class='item-thumb' alt='' border='0' expr:height='data:thumbnailSize' expr:src='data:post.thumbnail' expr:width='data:thumbnailSize'/>
</a>
<b:else/>
<img class='item-nothumb' src='http://bit.ly/hGWr7r'/>
</b:if>
</div>
<div class='item-title'><a expr:href='data:post.href'><data:post.title/></a></div>
<div class='item-snippet'><data:post.snippet/></div>
</div>
<div style='clear: both;'/>
</b:if>
</b:if>
</li>
</b:loop>
</ul>
</div>
</b:includable>

Những phần được đánh dấu màu đỏ là phần được thêm vào. Ở đoạn code trên, tôi đã viết thêm code để cho bài viết không có ảnh vẫn hiển thị ảnh đại diện mặc định là ảnh nothumbnail (tiện ích Popular Posts của Blogger không có chức năng này, chỉ hiển thị phần tóm tắt đối với bài viết không có ảnh).

Bước 4. Đặt đoạn code sau đây vào sau dòng ]]></b:skin>.

<!-- Popular Posts Widget Styled by Huynh Nhat Ha -->
<style type="text/css">
.popular-posts ul {border-bottom: 1px dotted #555; list-style-type: none; margin: 0; padding: 0; }
.popular-posts ul li {background-color: transparent; border-top: 1px dotted #555; clear: both; list-style: none; }
.popular-posts ul li:hover {background-color: #123; }
.popular-posts .item-content { padding: 5px; }
.popular-posts .item-title {height: 50px; }
.popular-posts .item-title a {color: #5CB3FF; font-family: Arial; font-size: 12px; font-weight: bold; }
.popular-posts .item-title a:hover {color: #CDE; text-decoration: none;}
.popular-posts .item-thumbnail { float: left; margin: 0 5px 0 0;}
.popular-posts img {height: 50px; width: 50px;} // Điều chỉnh số chỉ chiều rộng và chiều cao ảnh đại diện
.popular-posts .item-snippet {clear: both; color: #999; font-family: Arial; font-size: 12px;text-align:justify}
</style>

Lưu Template là thành công.
More about